New Updates January 2026.
Applying for an NBI Clearance is a crucial step for Filipinos needing proof of a clean record. Whether you’re applying for a job, renewing your passport, traveling abroad, or securing a government license, this clearance is one of the most frequently requested documents.
In the past, getting an NBI Clearance meant standing in long lines, waiting hours just to register, and sometimes returning on multiple days to claim your document. Thankfully, those days are over. With the NBI Clearance Online system, applicants can register, pay, and set appointments from the comfort of their homes — minimizing wait times and making the process far more efficient.
This article is your ultimate 2026 guide to applying for an NBI Clearance online. We’ll walk you through:
By the end of this guide, you’ll be equipped with everything you need to get your NBI Clearance quickly, smoothly, and without confusion.
Definition and Purpose
An NBI Clearance is used for various types of transactions issued by the National Bureau of Investigation (NBI), and it’s an official document that verifies whether or not a person has a criminal record in the Philippines. It serves as proof that you either have a “clean record” or, if applicable, discloses that you are subject to pending cases.
Employers, schools, embassies, and government agencies require NBI Clearance because it is a trusted, nationwide background verification tool. Unlike a police clearance, which only checks records within a municipality or city, the NBI Clearance checks across the entire country.
Why It’s Important
NBI vs Police Clearance
👉 Tip: If you’re applying abroad or dealing with national-level agencies, you should always secure an NBI Clearance instead of relying solely on police clearance.
Primary Valid IDs Accepted
When applying, you need at least one (1) valid government-issued ID. Accepted IDs include:
To Know more about your NBI Requirements, visit our article for Requirements for NBI Clearance.
Supporting Documents
Applicants without a primary ID may bring two (2) secondary IDs plus a supporting document such as a birth certificate or barangay clearance.
Common Mistakes
👉 Pro Tip: Always bring two valid IDs, even if only one is officially required. This prevents delays if one is questioned. For more information about Valid IDs, here’s a link that can help you better prepare for which Valid IDs are accepted in NBI Clearance for 2026.
The NBI has streamlined the process into 8 simple steps. Below we expand each step with screenshots, examples, and tips
Step 1 – Visit the Official Website
The only legitimate website for NBI Clearance is:
👉 https://clearance.nbi.gov.ph
On the homepage, you will find buttons for “Register” (for new users) and “Sign In” (for existing users).
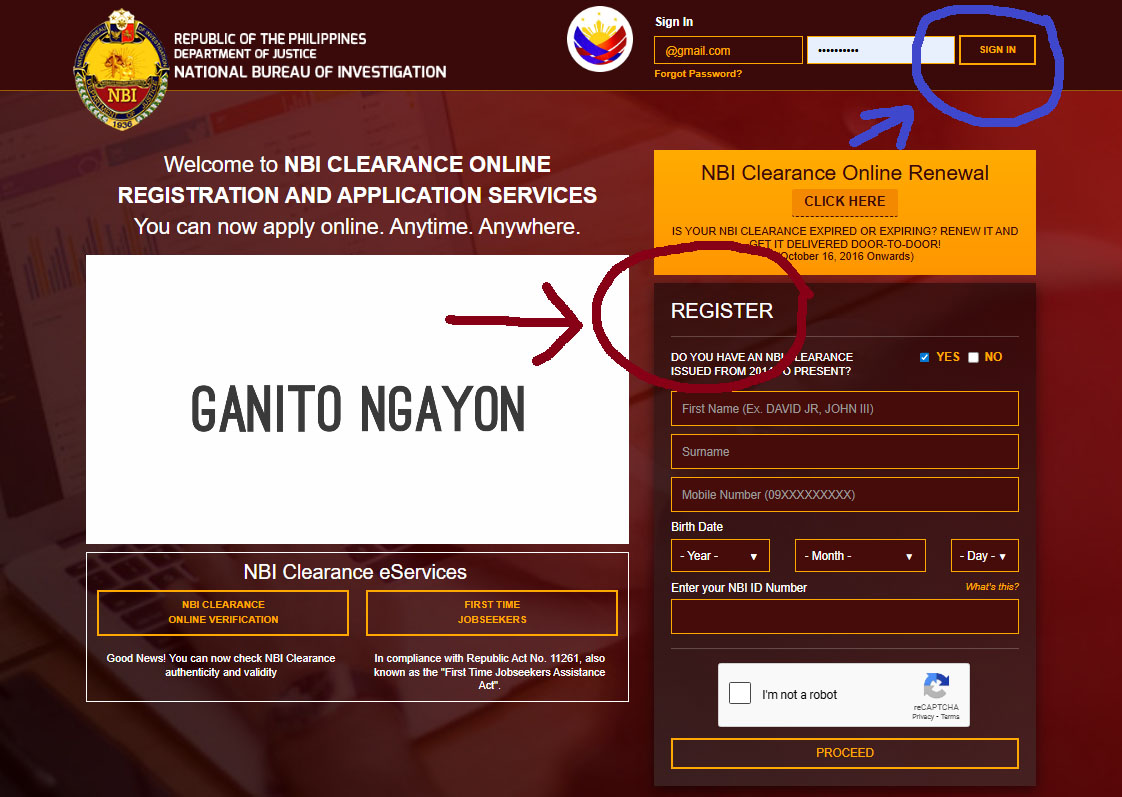
Beware of fake or third-party websites. NBI does not authorize any external agencies to handle clearance applications.
Step 2 – Create an Online Account
If you’re a first-time applicant, click Register and complete the registration form. Provide:
You’ll also need to answer: Do you have an old NBI Clearance?
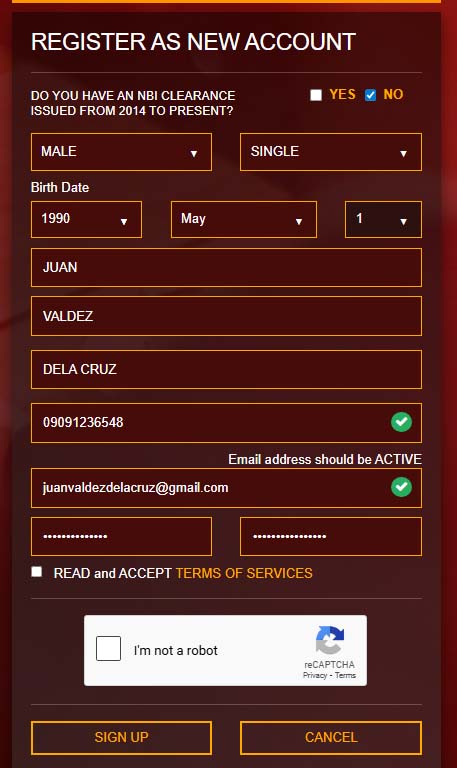
👉 Registration form filled with sample details — Juan Dela Cruz, Male, born May 1, 1990, Single, Email: juandelacruz@example.com.
👉 Tip: Use a personal email that you will always have access to. Avoid school or company emails that may be deactivated later.
Step 3 – Fill Out the Application Form
Once logged in, you’ll be directed to the application form dashboard. Here you’ll need to enter:
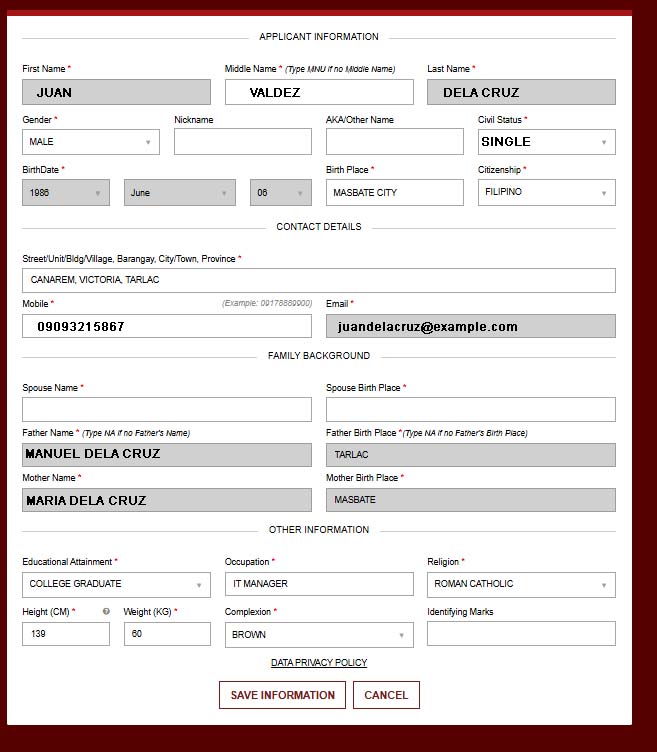
👉 Application form showing text fields with required fields marked by red asterisks.
Example:
Juan Santos Dela Cruz
Born: May 1, 1990 – Quezon City
Filipino – Single
Address: Cubao, Quezon City
Education: College Graduate
Employment: IT Specialist
👉 Tip: Double-check spelling, especially for middle names. Minor typos can cause mismatches and delay release.
Step 4 – Choose an Appointment Schedule
After completing the application form, you will need to set an NBI Online appointment at your preferred NBI branch. If you are not sure how to schedule an NBI Online Appointment, you can click on the article on how to do so.
On your dashboard, you’ll see a calendar interface with available dates and time slots.

👉 Calendar showing January 2026 with blue-highlighted boxes on January 15–19, blank boxes on weekends.
Example Scenario: Juan Dela Cruz selects Las Piñas City branch, chooses January 15, 2026, and picks the Morning session (8:00 AM – 12:00 PM).
Tips for Scheduling:
👉 Pro Tip: Print or save a copy of your appointment slip immediately after booking. Some applicants forget this step and have to log back in to re-download.
Step 5 – Pay the NBI Clearance Fee
The current fee is ₱130 + ₱25 service charge (₱155 total).
Available Payment Options:
- Open your GCash app.
- Tap Bills Payment → Government → NBI.
- Enter your reference number from the online system.
- Confirm and screenshot the receipt.
Related Article: How to Pay NBI Clearance Using GCash.
- Select Pay Bills → NBI.
- Input the reference number and pay.
7-Eleven / CLIQQ Machine
- Tap Bills Payment → NBI on the machine.
- Enter your reference number.
- Pay at the cashier and keep your receipt.
Bayad Center / MLhuillier / Palawan Express
- Provide the cashier with your reference number.
- Wait for confirmation.
Online Banking (DragonPay)
- Choose your bank from the dropdown.
- Log in and complete payment.
Payment Confirmation
After paying, log back in to your NBI account:
- Go to Transactions → Status.
- If successful, it will show “Paid”.
👉 Pro Tip: Payments through e-wallets update within minutes. OTC payments may take 12–24 hours. Always screenshot your receipt as proof.
Step 6 – Attend Your Biometrics Appointment
On your scheduled date, proceed to your chosen branch.
What to Bring:
- Valid ID (the one used online)
- Appointment Confirmation Slip
- Official Receipt (if printed)
What Happens at the Branch:
- Queue at the entrance and show your slip.
- Proceed to biometric capture area.
- Your fingerprints will be scanned digitally.
- Your photo will be taken.
- Staff will confirm your personal details.
Tips for Biometrics:
- Arrive 30 minutes early to avoid losing your slot.
- Dress neatly; your photo will be part of the clearance.
- Avoid wearing caps, heavy makeup, or colored contact lenses.
👉 Pro Tip: If you can’t make it, reschedule before paying. Once payment is confirmed, rescheduling is no longer allowed. To learn how to reschedule, read our article on How to Reschedule your NBI Clearance Appointment.
Step 7 – Processing and Verification
After biometrics, your application goes to the verification process.
- If your name is unique and clear, your clearance is usually released the same day.
If your name matches someone under investigation, your application will get a “HIT” status.
What “HIT” Means:
A HIT means your name is identical or similar to someone with a pending case. It does not automatically mean you have a criminal record.
- Verification takes 5–10 working days.
- If cleared, your NBI Clearance will be released.
👉 Pro Tip: Don’t panic if you receive a HIT. Many Filipinos share common names (like Juan Dela Cruz or Maria Santos). This is a routine security check.
Step 8 – Print and Claim Your Clearance
Once your status updates to “Released”, you can print your clearance.
How to Print:
- Log in to your NBI account.
- Go to Transactions → Print Clearance.
- Download the PDF copy.
- Print using A4 paper.
Printing Guidelines:
- A4 paper only (letter size is not allowed).
- Ensure barcodes and QR codes are clear and scannable.
- You can print in black-and-white or colored ink.
👉 Pro Tip: Always save a digital copy of your clearance. It makes renewals easier since you’ll need the old NBI ID number. Don’t know how to save your Digital copy of your NBI Clearance? Here is the link to learn how to save the NBI Clearance Application Form.
Renewing is much faster than first-time applications.
Quick Renewal Service
If your details haven’t changed (same name, same IDs):
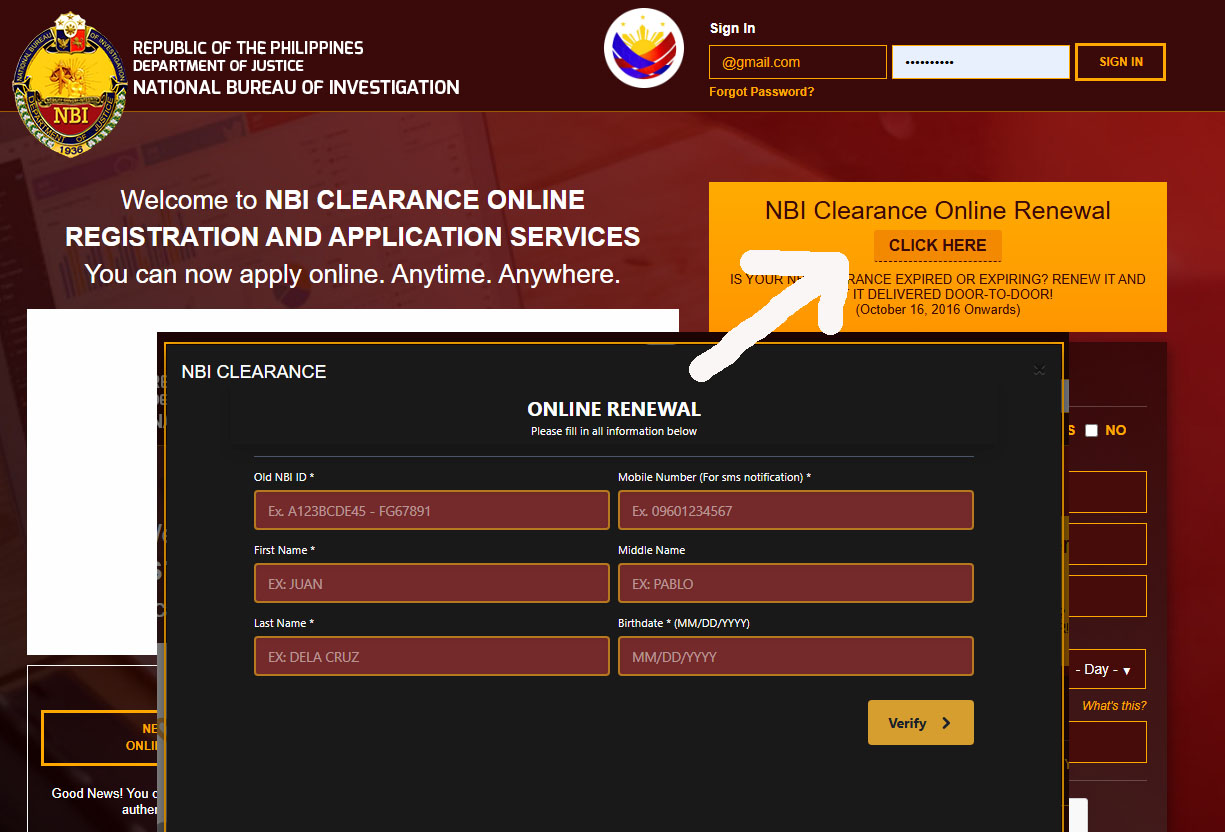
👉 Screenshot Description: Online dashboard with “Quick Renewal” button highlighted.
For a full tutorial of NBI Renewal with screenshots of the step-by-step process, visit NBI Renewal Online.
Walk-in Renewal
If your details changed (e.g., name after marriage), you’ll need to:
- Log in and register a new appointment.
- Attend biometrics again.
Common Renewal Issues:
- Lost old NBI Clearance number.
- Expired ID used during renewal.
- Name change not updated in government IDs.
👉 Pro Tip: Always scan and save your clearance. That way, you’ll always have your NBI ID number ready for renewal.
Payment Options Explained
NBI partnered with multiple payment channels for flexibility.
1. Digital Wallets (Fastest)
2. Over-the-Counter
3. Online Banking
👉 Comparison Table Screenshot Description: 3 columns (Digital Wallet, OTC, Bank), rows showing speed, convenience, and fees.
Pro Tips for Payment:
- Always screenshot receipts.
- If status doesn’t update, wait 24 hours before contacting support.
- Pay within 24 hours of generating reference number (otherwise, it expires).
Even with the streamlined online system, applicants often encounter issues. Below are the most common problems and their solutions.
HIT Status
Problem:
You receive a “HIT” status after biometrics, meaning your name matches someone with a pending criminal case.
Solution:
- Wait 5–10 working days for verification.
- If cleared, your clearance will be released automatically.
- If further verification is required, NBI will contact you for an interview.
👉 Tip: Sharing common names like Maria Santos or Juan Dela Cruz increases the chance of a HIT. Always apply early if you have upcoming deadlines.
To know more about the NBI Hits Status, like the Reason why you get a Hit in the NBI Clearance? Visit the NBI Clearance “Hit” Status, and you will know the reason why you always get hit.
Delayed Release
Problem:
Your clearance is not released even though you’ve completed biometrics.
Solution:
- Log in to your account → check if payment shows as Paid.
- If status is “Processing,” wait 1–2 days.
- If longer, call NBI hotline or email support.
Wrong Information on Clearance
Problem:
Your printed clearance shows misspelled names, wrong birthday, or incorrect civil status.
Solution:
- Bring valid ID to your NBI branch.
- File a Correction Request.
- The staff will update details and reprint your clearance.
👉 Tip: Always double-check your application form before submitting.
Missed Appointment
Problem:
You failed to show up on your scheduled date.
Solution:
- Your payment remains valid.
- Log in again and book a new appointment using the same reference number.
👉 Pro Tip: Don’t wait until the last minute. Book dates when you’re sure you’re available.
Printing Issues
Problem:
Your clearance won’t print clearly, or the PDF won’t open.
Solution:
- Install/update Adobe Acrobat Reader.
- Use A4 size paper.
- Adjust printer DPI to at least 300 DPI for barcode clarity.
Applying online saves time, but these tips will make the process even smoother.
Choose Off-Peak Months
Avoid:
Best months: March–May and September–November.
Book Early Morning Slots
- Morning sessions (8:00 AM – 10:00 AM) are less crowded.
- Afternoon slots often experience delays.
👉 Pro Tip: Arrive at least 30 minutes early even if you have an appointment.
Prepare Documents in Advance
Save All Digital Copies
Your reason for getting an NBI Clearance may vary. Here are the most common scenarios:
For Local Employment
👉 Example: A fresh graduate applying at a call center must present an NBI Clearance before signing the contract.
For Travel Abroad
👉 Example: A nurse applying for work in Canada must submit an apostilled NBI Clearance to the embassy.
For Government Transactions
👉 Example: A nurse applying for work in Canada must submit an apostilled NBI Clearance to the embassy.
Applicants often need guidance, especially if payments don’t reflect or HIT statuses delay clearance. Below are the official and safe channels.
👉 Tip: Always rely on official channels. Avoid relying on social media “fixers” or third-party sites.
Here are 15 of the most common questions.
1. How much is the NBI Clearance fee in 2026?
The fee for NBI Clearance remains ₱130, plus a ₱25 service fee, totaling ₱155. Some payment partners may add a minimal convenience charge (₱5–₱10).
This fee covers the processing and release of your clearance, regardless of purpose (local employment, travel, or government use). It’s valid for one year from the date of issuance.
2. What IDs are accepted for NBI Clearance application?
Accepted IDs include passport, driver’s license, UMID, SSS, Postal ID, PRC license, GSIS, PhilHealth, and student ID (for enrolled students). You only need one valid ID, but bringing two is strongly recommended.
Expired IDs, damaged cards, or photocopies are not accepted. The ID must be original, valid, and clearly readable.
3. How do I know if my payment was successful?
After paying via GCash, PayMaya, or OTC channels, log back in to your account and check Transactions. If payment is confirmed, the status will show “Paid.”
E-wallet payments usually update in minutes. Over-the-counter transactions may take 12–24 hours to reflect. If the status hasn’t updated within 48 hours, contact NBI support and provide a copy of your receipt.
4. Can I reschedule my NBI Clearance appointment?
Yes, but only if you haven’t paid yet. Once you’ve completed payment, your appointment is locked and cannot be changed. You can read our article on rescheduling your NBI Clearance.
If you can’t attend, your payment remains valid. You must book a new appointment date using the same reference number. This makes it important to carefully choose your schedule before paying.
5. What should I do if I forgot my NBI Clearance account password?
Click “Forgot Password” on the login page. Enter your registered email address, and NBI will send a reset link. If you want the tutorial, here is how to reset the password for the NBI Clearance account.
If you no longer have access to your registered email, you’ll need to create a new account. Always use a personal email (not a school or company email) to avoid losing access.
6. What does “HIT” status mean?
A HIT means your name matches that of another person in NBI’s database who has a pending case or derogatory record. It doesn’t mean you are guilty — it just triggers additional verification.
If you get a HIT, expect a delay of 5–10 working days. If cleared, your certificate will be released. In rare cases, you may be asked to appear for further verification.
7. How long does it take to get my NBI Clearance?
If there’s no HIT, clearances are often released on the same day as biometrics. You may be able to claim or print your certificate within a few hours.
If there’s a HIT, the process may take up to 2 weeks depending on the case backlog. This is why applicants with upcoming deadlines (job interviews, embassy requirements) should apply early.
8. Can I apply for NBI Clearance without an appointment?
No. The NBI strictly requires an online appointment before visiting any branch. Walk-ins are not entertained.
This system ensures faster processing, reduces congestion, and avoids fixers. Always register online, book an appointment, and bring your confirmation slip.
9. Is NBI Clearance valid for overseas employment?
Yes. NBI Clearance is accepted for work visa and immigration applications abroad. However, it must first be authenticated (apostilled) by the Department of Foreign Affairs (DFA).
This apostilled clearance becomes internationally valid and is recognized by embassies, consulates, and foreign employers.
10. Can someone else claim my NBI Clearance?
No. Personal appearance is required during biometrics and release. Only the applicant can appear for fingerprint scanning and photo capture.
This rule prevents fraud and ensures that the clearance truly belongs to the applicant. If you cannot attend, reschedule your appointment before paying.
11. How do I update incorrect information in my NBI Clearance?
You must file a Correction Request at the NBI office where your clearance was processed. Bring valid IDs and documents that support the correction (e.g., birth certificate, marriage certificate).
Errors in names, birthdays, or civil status can only be corrected in person. The staff will verify your documents, make corrections, and reprint your clearance.
12. What happens if I miss my appointment schedule?
If you fail to attend your scheduled date, don’t worry — your payment is still valid. You just need to log back in and rebook another appointment.
However, you cannot reschedule to the past date. Always pick a new available slot, preferably within 2 weeks to avoid payment expiration.
13. How can I renew my NBI Clearance without biometrics?
If your details remain the same (no change in name, birthday, or ID), you can use the Quick Renewal Service. Enter your old NBI Clearance ID number online, pay, and wait for delivery.
If your details have changed, you must attend biometrics again as a walk-in renewal applicant.
14. Is the NBI Clearance valid nationwide?
Yes. NBI Clearance is valid across all cities and provinces in the Philippines. It is accepted by both private companies and government offices.
This nationwide scope makes it more reliable than a police clearance, which only covers a specific municipality or city.
15. What is the validity period of the NBI Clearance?
The NBI Clearance is valid for 1 year from the date of issuance. After this, you need to renew.
Employers, embassies, and agencies typically require a clearance that is at least 6 months valid at the time of submission, so plan ahead.
The introduction of the NBI Clearance Online system has revolutionized one of the Philippines’ most important government processes. What once required hours of waiting in line and multiple trips to an office can now be done with just a few clicks.
From account registration, payment, and appointment scheduling to biometrics and renewal, the online system streamlines the entire workflow. Applicants save time, avoid hassle, and get their clearance faster.
This guide has shown you every step:
By following these steps, you’ll ensure a hassle-free NBI Clearance application in 2026.
✅ Ready to apply? Visit the official portal at https://clearance.nbi.gov.ph and start your application today.
